
How we play
“A beautiful range of ideas to get creative with the children. I’ve used so many with my two wee ones but also in school as an early years teacher. A wonderful resource.”
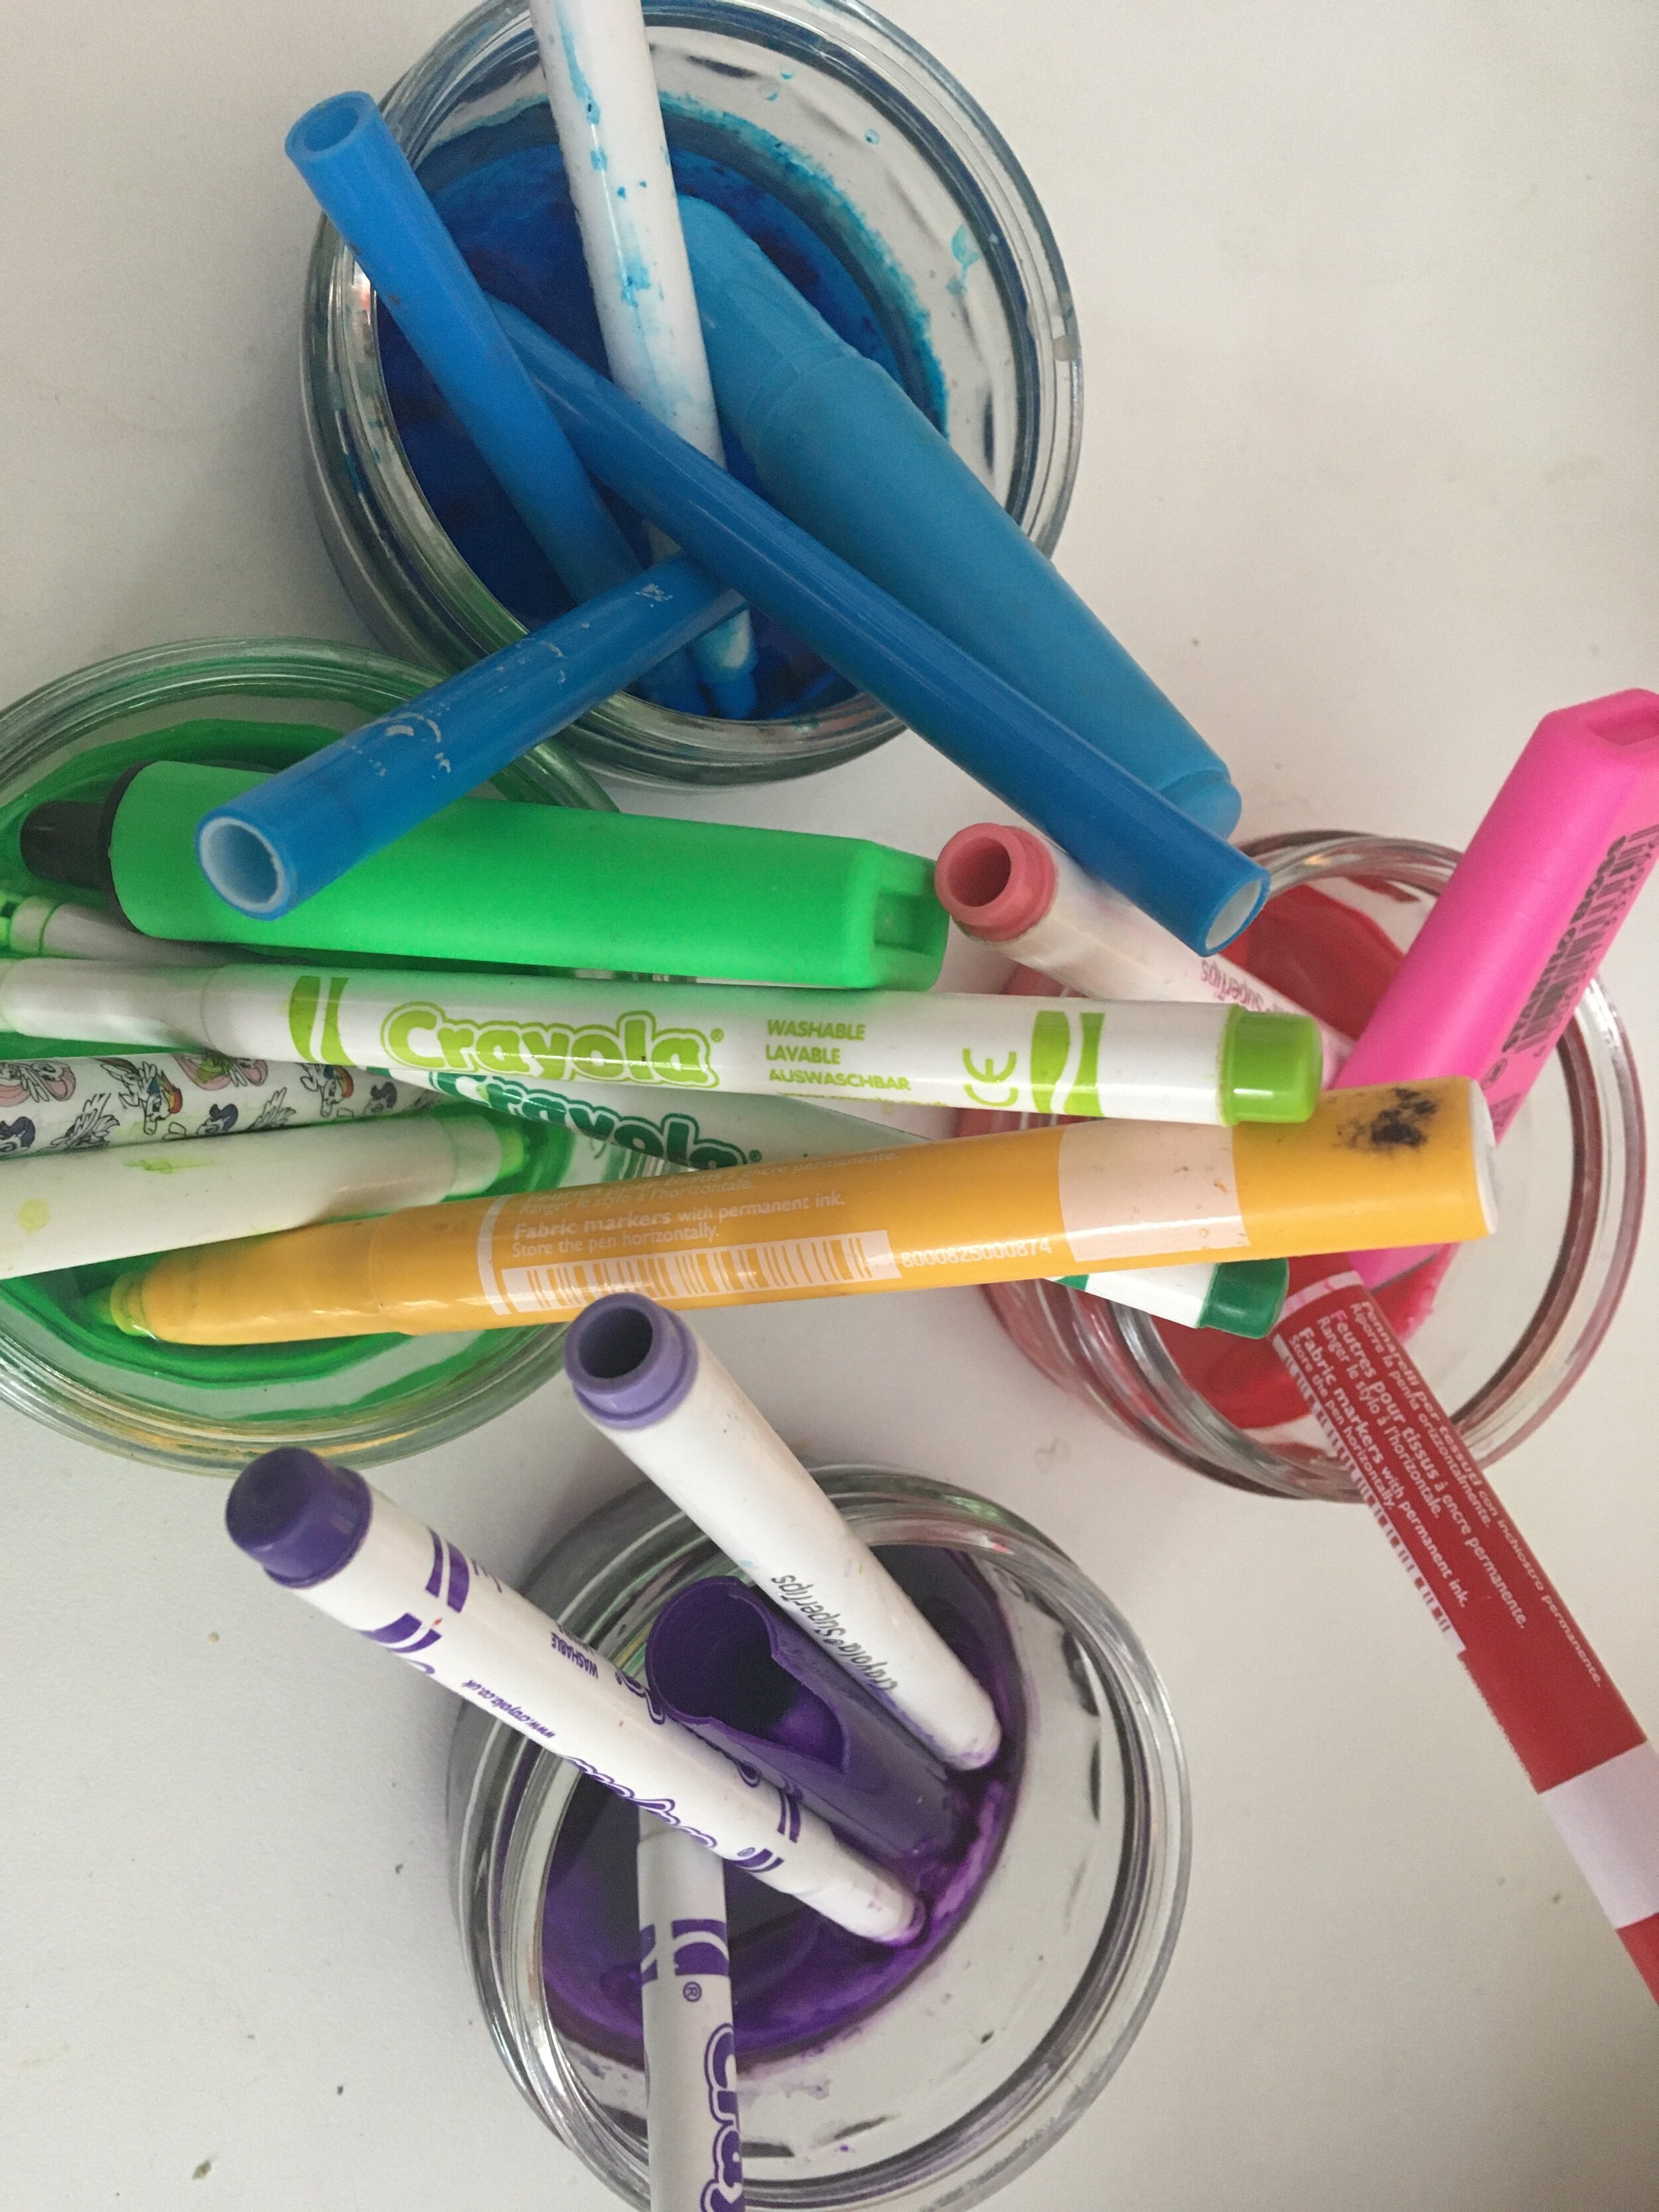
Teaching the politics of colouring-in! Zillions of crayons, colouring pencils and felt-tip pens are part and parcel of family life (along with endless drawings and scribbled-on bits of paper). So this presents quite a nice opportunity to talk about reducing waste. As well as melting wax crayon stubs down to make new ones [see ‘Rainbow crayons’ below], used felt-tip pens can be soaked in water to make watercolour paints. Once you have done with them, donate to TerraCycle for them to be recycled into plastic furniture/playground surfaces/watering cans etc. (Find your nearest drop-off location here - 1p per pen gets donated to charity or a school). And don't forget to sharpen your wooden pencils directly into the compost/food waste bin to remind your child that they are the better choice because they are biodegradable; the worms can eat them. Plastic pens and plastic wax crayons, on the other hand, give them bellyache.

Ice art. Pop about 2cm of water into a tub or some rigid plastic packaging and drop in some decorations. You can use cookie cutters to make different shapes in a tray/washing-up tub of shallow water. Add food colouring for some stained glass action. Dip the end of a piece of string into the water so you can hang up your decorations. Leave outside overnight. Et voila.

Snow fun. Funny snow creatures using leaves, feathers, sticks and berries (you can hang them up on a snow mobile if you attach a twig to some string and build your snowball around it), snow slushies (in small amounts - make sure it’s pristine snow and not from the roadside - we added defrosted blackberries and sprinkles), snow wall art (chuck a few snowballs at a wall) and a snow lantern for after dark - my favourite.

Frozen laundry. So much scope! How about a sock line-up? I think the flamingo did it. But nothing says winter better than some frozen laundry bunting, especially if it’s publicly displayed in your driveway. Not sure if there’s something wrong with me but I find this very funny. Pop the clothes in water and hang them out on the washing line (or lay them flat on the ground) to freeze overnight. Please share your creations!

Decorate a stick. Couldn't be simpler. My 2 year old adores sticks and digs, pokes and battles his way through the day with any sticks he can find. He’s particularly fond of using the right-shaped stick as a trumpet. It's his implement of choice for probing and exploring the world, while he's far less keen on paintbrushes or pencils. For his 3rd birthday tomorrow his big sister and I have been decorating sticks for him. The bright colours have now piqued her interest in the potential of the humble stick.

Games with tiny toys. Send your child on a mission around the house to gather together those tiny toys that they never really play with, anything broken and any missing toy or game pieces. You could keep them in a designated box for games. Sort them into alphabetical order according to the letter they begin with or play a memory game with them, or a guessing game with yes/no answers. Get inspired by Tiny Toy Co that redeploys unwanted small toys for educational purposes.

Make your own charcoal! This is a cracking project for pyromaniac children. Or adults. All you need is access to branches from one of two trees - willow or pine - or grape vines. Take the bark off with a knife and then pop the sticks into an old biscuit tin to make your 'kiln'. Hammer a hole into the lid (very important!). To make doubly sure the lid wouldn't blow off in the fire, I hammered two nails into the side of the lid to secure it. Light your fire and bury the tin in the middle of it for at least an hour. Let the tin cool fully before opening it else the wood inside will turn to ash.
Credit for idea: Nick Neddo (author of The Organic Artist for Kids)

Whittling. Never thought I'd see the day when I whittled. But I think this is what I did. All you need is a soft wood tree (I chose rowan/mountain ash) and a penknife. This one is for older kids, although a veggie peeler works well for younger ones. My 5-year-old thinks these houses will go nicely with our wooden train set. Result.

Hammered flowers. Feels totally wrong to hammer a flower but the colourful carnage is really quite fabulous. Try it! Then see what you can 'see' in the mess.

Origami. But not the fiddly never-looks-like-the-picture origami. This is really straightforward and I might even put some of these dresses up on MY bedroom wall. We used 15cm x 15cm magazine pages (paper works better than card and ensure the pattern you want is on the outside of the paper for the first fold, and that it's upside-down). Quick video tutorial here. Oof I love these.
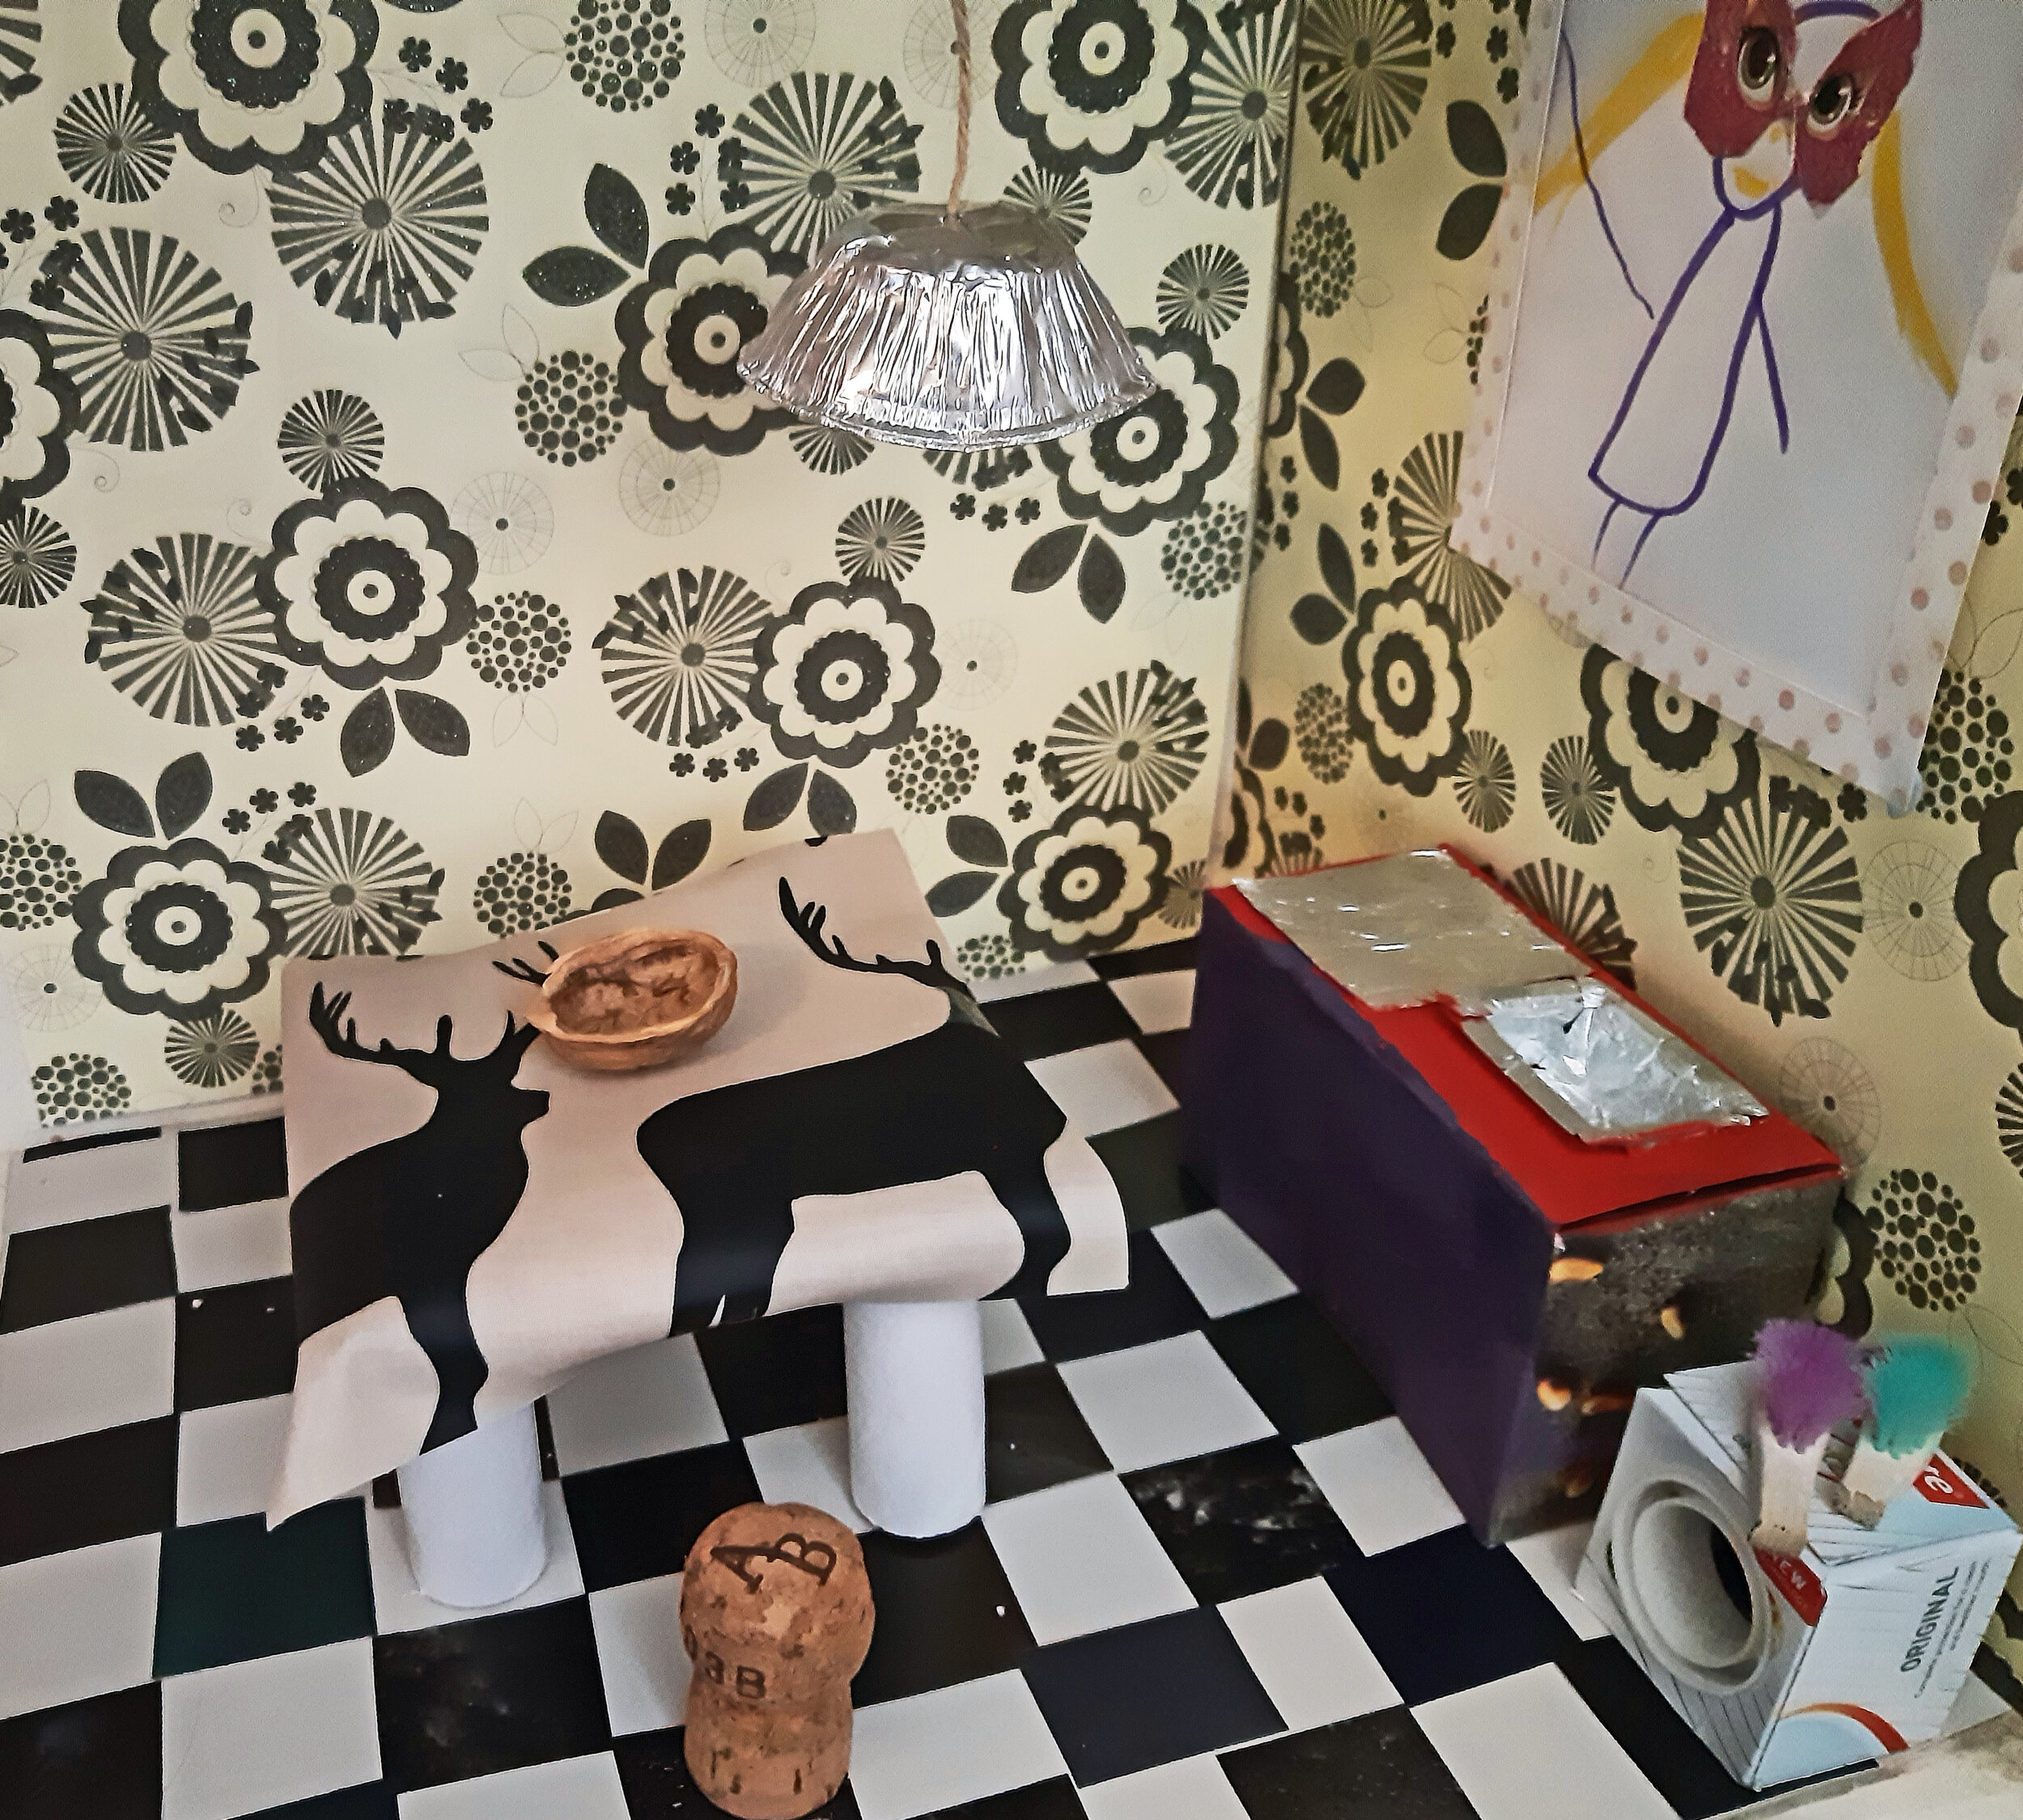
Dolls house on a shelf (a work in progress). Well actually ours is a fairy hotel. We have a kitchen (pictured) and a living room on one shelf and the bedrooms upstairs on the shelf above. This has been a lot of fun. And no big dolls house to fall over + you get to choose the decor. So far we have a cork stool, sellotape washing machine, mince pie case lampshade, artwork by the 5-year-old, toothbrush brushes, walnut shell fruit bowl, tablecloth offcut tablecloth, tin foil tube table legs…

A ‘get creative’ box. What's in yours? If items are mostly biodegradable or waste by-products, then you're winning. We've got wood shavings and pencil shavings, dried citrus peel stars, pressed leaves/flowers, seed heads, cones, shells, straw, confectionary wrappers, Christmas cards and magazines, scrap fabric (holey clothes that can’t be passed on), beer caps/foil cases, lolly sticks and toothbrushes, corks, straw, feathers, wool... We also use lentils, pasta, nut shells, flour and salt from the kitchen. Glue, paints and pencils too. Have I missed anything? Old teeth and hair might be a bit niche… Challenge your child to create without plastic crafts, glitter, stickers. See what happens.

Turn back the clock. My eldest is 6 and when I was her age, it was 1984/5. Shift the baseline, as they say, and spend a day (or a week!) as you would have done in the 1980s. Only magazines with no plastic toys, find YouTube clips of Sesame Street/Bagpuss/Tom and Jerry, limit toys to 5 or so, no devices, no plastic crafts, no fancy dress costumes and glittery/sequin clothes, lots of 'traditional' games, time spent outdoors and being inventive with stuff around the house. And boredom. But we turned out ok, didn’t we? Dig out old photos and tell some stories. I bet your happiest memories involved people more than stuff (save for a few special toys and clothes).

Fairy doors. They just love ‘em! But you don’t have to buy one. Paint a cork, pop some feathers and a cone in some blu-tack, source some bark on your next woodland walk for the door (though never take it off a tree that’s alive) + nut shell handles, and make a doormat out of sticks. No need for the bling (and packaging) that shop-bought ones come with.

Leaf accessories. Go forage for leaves and learn the names of the plants and trees that they come from. All you need is a hole punch + string, or a needle + thread to turn them into skirts, necklaces, crowns, anklets for you, your child and their toys… AND once dried, bigger leaves become fabulous musical shakers.

Teaching guardianship of things. Get your child to find 5 or more items around the house that you had when you were a child (or they can be older). Steer away from ornaments and focus on toys, stationery, kitchenware, books, clothes... Talk about why they have lasted - good quality, been taken care of - and how we're guardians of things rather than owners. Tell your child how special it is to see them enjoy what has been used/loved/worn/read by you and other family members. You could make a family tree of the things you have - one item per family member. And definitely tell some stories.

Sock puppet. Quite fiddly but very satisfactory, even if it looks a bit deranged. You will need 2 worn out socks, a small piece of red material, buttons (thank you Granny) and some card to stiffen the ears. Use the heel from one sock for the nose. (There’s lots of YouTube help on this). Mine were children's socks so the puppet fits my 5 year old's hand perfectly.

Honeysuckle basket. Well I never thought this would work. An absolute beauty it is, no matter what anyone says, because I did it! All by myself! It took me about 8 hours - the weaving is quick but the debarking of the vines takes time. So on minimum wage I would have to charge £69.76. No wonder we’ve lost the ability to do this. Perfect for bigger children to learn about patient, hard work. Go for it with this excellent step-by-step (I let my vines dry for 2 weeks and I used 3 x 26” warps and 1 x 18” one).

Egg carton fairy lights. Never met anyone who didn’t like fairy lights. And as the nights have started drawing in, we’ve dug ours out. Egg cartons make really easy no-glue fairy light decorations. I chose daffodils but if you Ecosia ‘egg carton flower lights’, you’ll be spoilt for choice.

A digital gift of time. Nothing says Happy Birthday like badly sung 90s rock. All you need is a guitar made from cardboard + 4 elastic bands (instructions here). Someone can croon to a mop, younger band members can be on drums (yoghut pots/saucepans + wooden spoons) and shakers (rice/pasta/lentils in a pot). Wigs essential. Record and send with lots of love.
Finger puppet. We used an egg carton, a bit of string to make the horn 'tips’, wool for the fringe + an old bamboo toothbrush for the neck. Good fun.

Apple printing! Ok so it’s not quite Halloween yet but these windfall apples needed used up because we’ve got more than we can eat. And they make the perfect pumpkin shape. Easy to carve into, to make bat or other shapes too.

Halloween fun. Yes there will be plenty of sweet treats too but spookifying real food is the fun part. It can be as simple as ‘poison’ apples presented in a bowl covered in skulls and crossbones or satsumas painted with scary faces. You can step it up with mummified sausages wrapped in pastry ‘bandages’, energy ball ‘eyeballs’, skeletons made from veg, pastry or asparagus ‘fingers’, ‘cockroach’ dates… there’s no end to what you can do.

It’s chore time! Make a feather duster out of whatever feathers you can find. Getting kids to do the chores is an important part of growing up. Obvs. Strap some feathers around a stick, using string to keep the feathers in place. Younger kids can dust the wainscoting and the corners of the room - they are the perfect height for it - older ones the bookshelves. In my experience, chores that involve water or brushes tend to create more mess than less.
Make your own watercolours. All you need is 1/2 cup bicarb of soda (of course), 1/3 cup white wine vinegar, 1/2 cup cornstarch + 1 tbsp glycerine or honey. Mix together and then pour into an ice cube tray. Gently stir in the food colouring - we used turmeric and spirulina too. Leave to set for several days.

Easter egg painting. I boiled a bit of old withered red cabbage for 45 mins and once it had cooled a little, put my egg in the drained water overnight, to darken the shell. I then added some lips from a magazine and some of my hair (from when I was a child - I really hold on to too much!). Anything goes.

Make a pinwheel! Simples. Out of anything lightweight and if waterproof, like this crisp packet, you don't have to remember to bring it inside. Nice intro to harnessing the power of the wind. Step-by-step guide here.

Paper mache! So this was my 6-year-old's idea; to make her favourite My Little Pony (I wouldn't have dreamt of suggesting it). This uses a 1 part cornstarch, 2 parts water concoction, thickened on the hob. I used strips of newspaper then painted over them (it took 2 attempts as too many layers of wet paper get too soggy). If this is a success, this is pretty revolutionary; being able to make a branded toy that is valued as much as the real thing would be, despite the mad hair. The love and time that has gone into this will surely count for something too.

Plantable paper. Tear up scraps of paper (we used Who Gives a Crap loo roll wrapping), add warm water and blend (can add food dye too). Pour mush into cookie cutter shapes and gently press in fresh flowers and wildflower seeds (ideally seeds are 1cm apart…). Make sure you usebuy organic seeds that aren’t coated in pesticides, which harm insects. When dry send to a friend: tell them to add a few drops of water at a time and when seedlings 3-4 cm tall, to plant out in soil. Write on back 'With lots of love'.

A stitched pic. Dead simple with wool, embroidery thread or 2-3 strands of ordinary thread used together for some extra thickness. If you sketch your picture on a piece of cardboard then pierce holes along the lines with a needle, your child can ‘sew’ the picture themselves. It can be coloured in afterwards too.

Rainbow crayons: Dig out old broken crayons & stubs and melt them to make new rainbow ones. Finding them, peeling the paper off + then grouping them into rainbow colours will take a nice chunk of time. Pop in oven in a heat-proof mould for 10ish mins on a medium heat.

Lashing sticks. I made a couple of these stick ‘mats’ by ‘lashing’ them together; simply weave twine over and under the twigs a couple of times and then secure each join by winding the twine around each one. The raft was the most popular. Must be plenty of other uses for these - bet your child has more ideas than you do!

Foraged creations. No need for shop-bought plastic crafts. With the potential of open-ended natural materials, with no predetermined use, children can get their imaginations really fired up. Try and find cones, feathers, moss, beech nuts, acorns, shells, wool (on fences), straw or bark (the underside is great for painting on) and nut shells, lentils, rice, popcorn and pasta in the kitchen.

A tat map (a work in progress). See what toys, crafts, freebies and seasonal or celebratory stuff you have that holds minimal entertainment, educational or creative value for your child (or just breaks), that just adds to the clutter, then ends up in the bin. Where was it all made? Most of ours was made in China so we've been trying to learn something about that country; to rewrite the narrative. China isn't producing all this tat, we are. We've read about some customs, historical facts, danced to some music and enjoyed some food, and looked at pictures of the country's wildlife and landscapes.

Painting photographs. I used to take a lot of photos that I thought were very good. They're actually not. Now I have found a use for them. You can also have fun painting moustaches, colourful hair and bright red lips onto family snaps.

Make your own paintbrushes! And guidance comes from the highest of authorities - the Royal Academy. See here. We made ours from my hair, pine needles and straw and used rubber bands + string to bind them to a twig. But you can use feathers, pampas grass, leaves… anything. Fine art it isn't, but it's fun.

Pencil shaving animals! I don't know about you but we have a lot of largely ignored stubby pencils + low quality ones that are no match for the wonderful ones you pay a lot more for (totally worth it - no need for end-up-in-landfill plastic felt-tip pens). Use a sharpener or a penknife. Go #30DaysWild.

Diversify your toys. Children's toys are an important introduction to the world we live in. Do the dolls and figurines your child plays with reflect the ethnically, racially, religiously, culturally and physically diverse world we live in? Ours don’t. Celebrating difference but understanding our commonalities is crucial if we and future generations are to successfully coordinate a global response to climate change. Show your child these two websites and ask them what they think - Toy Like Me and Diverse Dolls 4 All. (Photo credit: Toy Like Me)

Shaggy rug (for a doll’s house). This can be as big as the piece of cardboard you work on. Cut 0.5cm slits into the edge of a piece of cardboard at 0.5cm intervals and then do the same on the opposite side. Stretch pieces of wool or strips of scrap fabric across the cardboard and into the grooves, securing on the back with a piece of tape. Then use a needle to weave wool across the lines, up and over the pieces of wool already in place. Remove the cardboard and secure the ends.
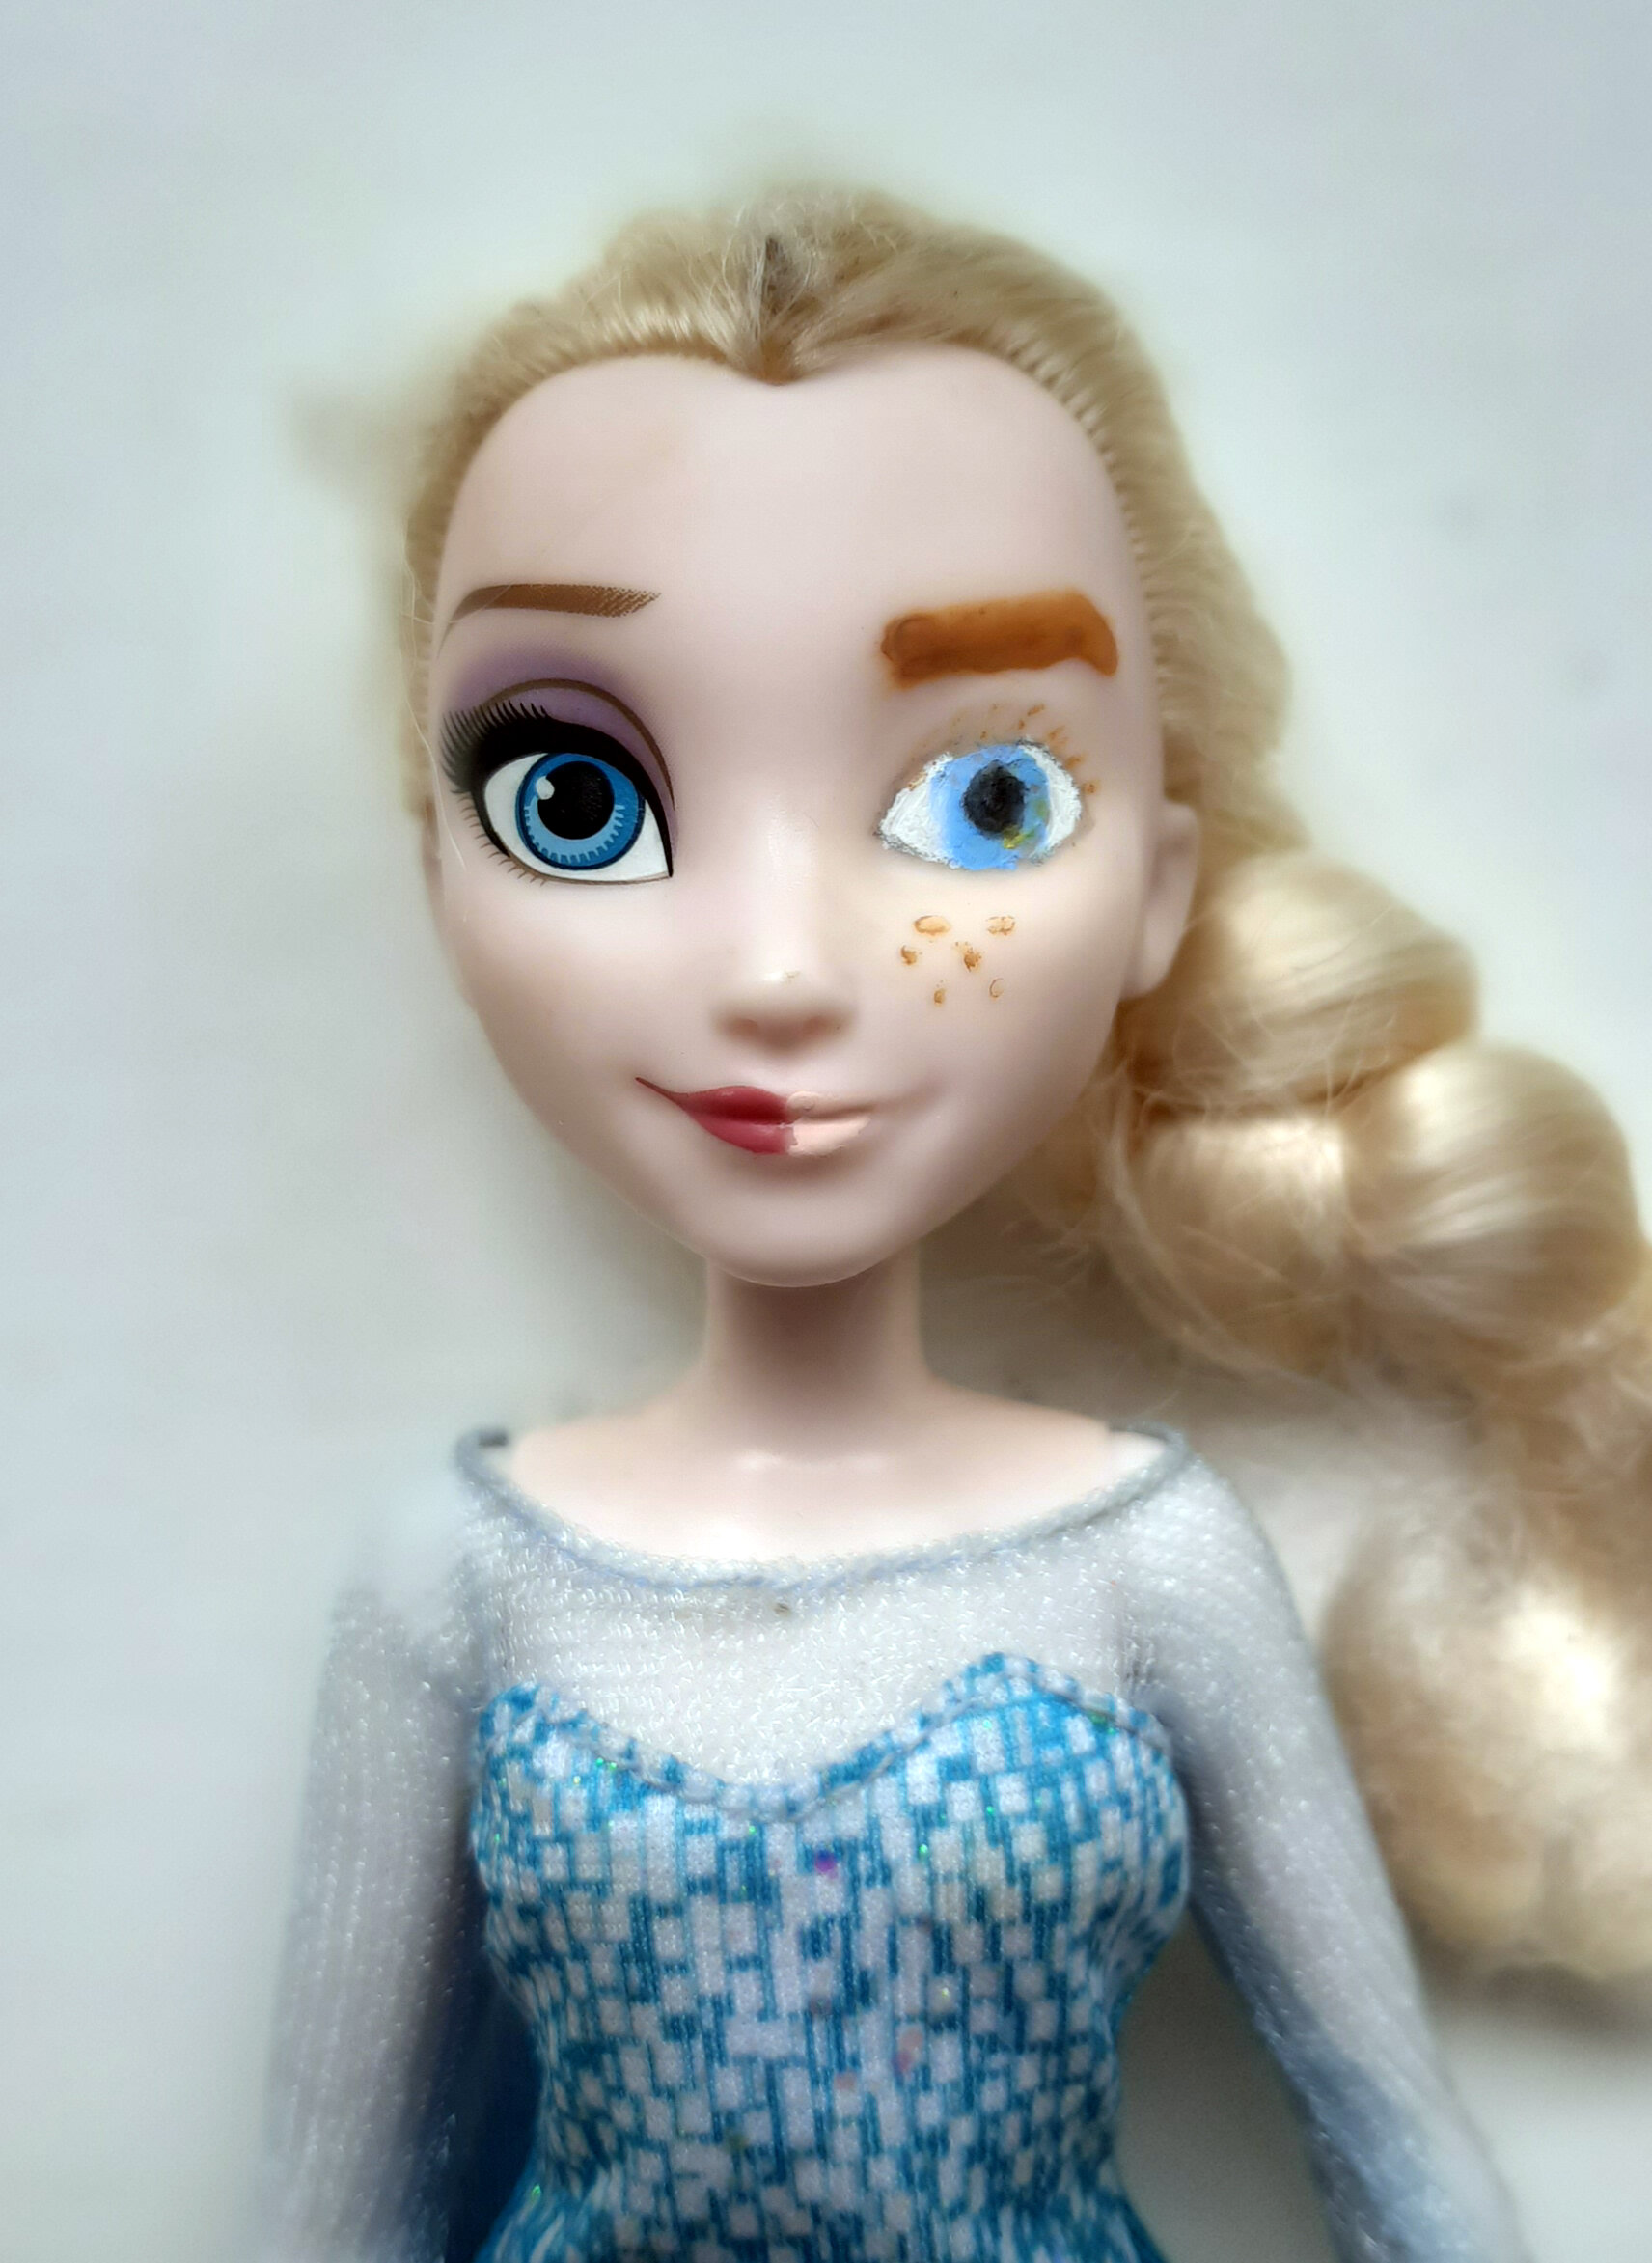
Reinventing dolls. Well this was FUN. And gave rise to a useful conversation with my 6 year old about what ‘pretty’ looks like. All you need is an unrealistic-looking doll, some nail polish remover (oddly, not all work - Boots own brand does), some paints/pens/watercolour pencils + a steady hand. If your efforts (like mine) make the doll look unwell - and Elsa’s ‘new’ eye is still too large here - get some inspiration from Tree Change Dolls, who upcycle dolls and make them look ‘normal’.

Leaf silhouettes. All you need is a sharp knife, steady hand and a thick leaf. Use a torch to bring your silhouettes to life or use them as a stencil and gently paint over them. If you want to preserve them, simply dip in melted beeswax and leave to dry on parchment paper.
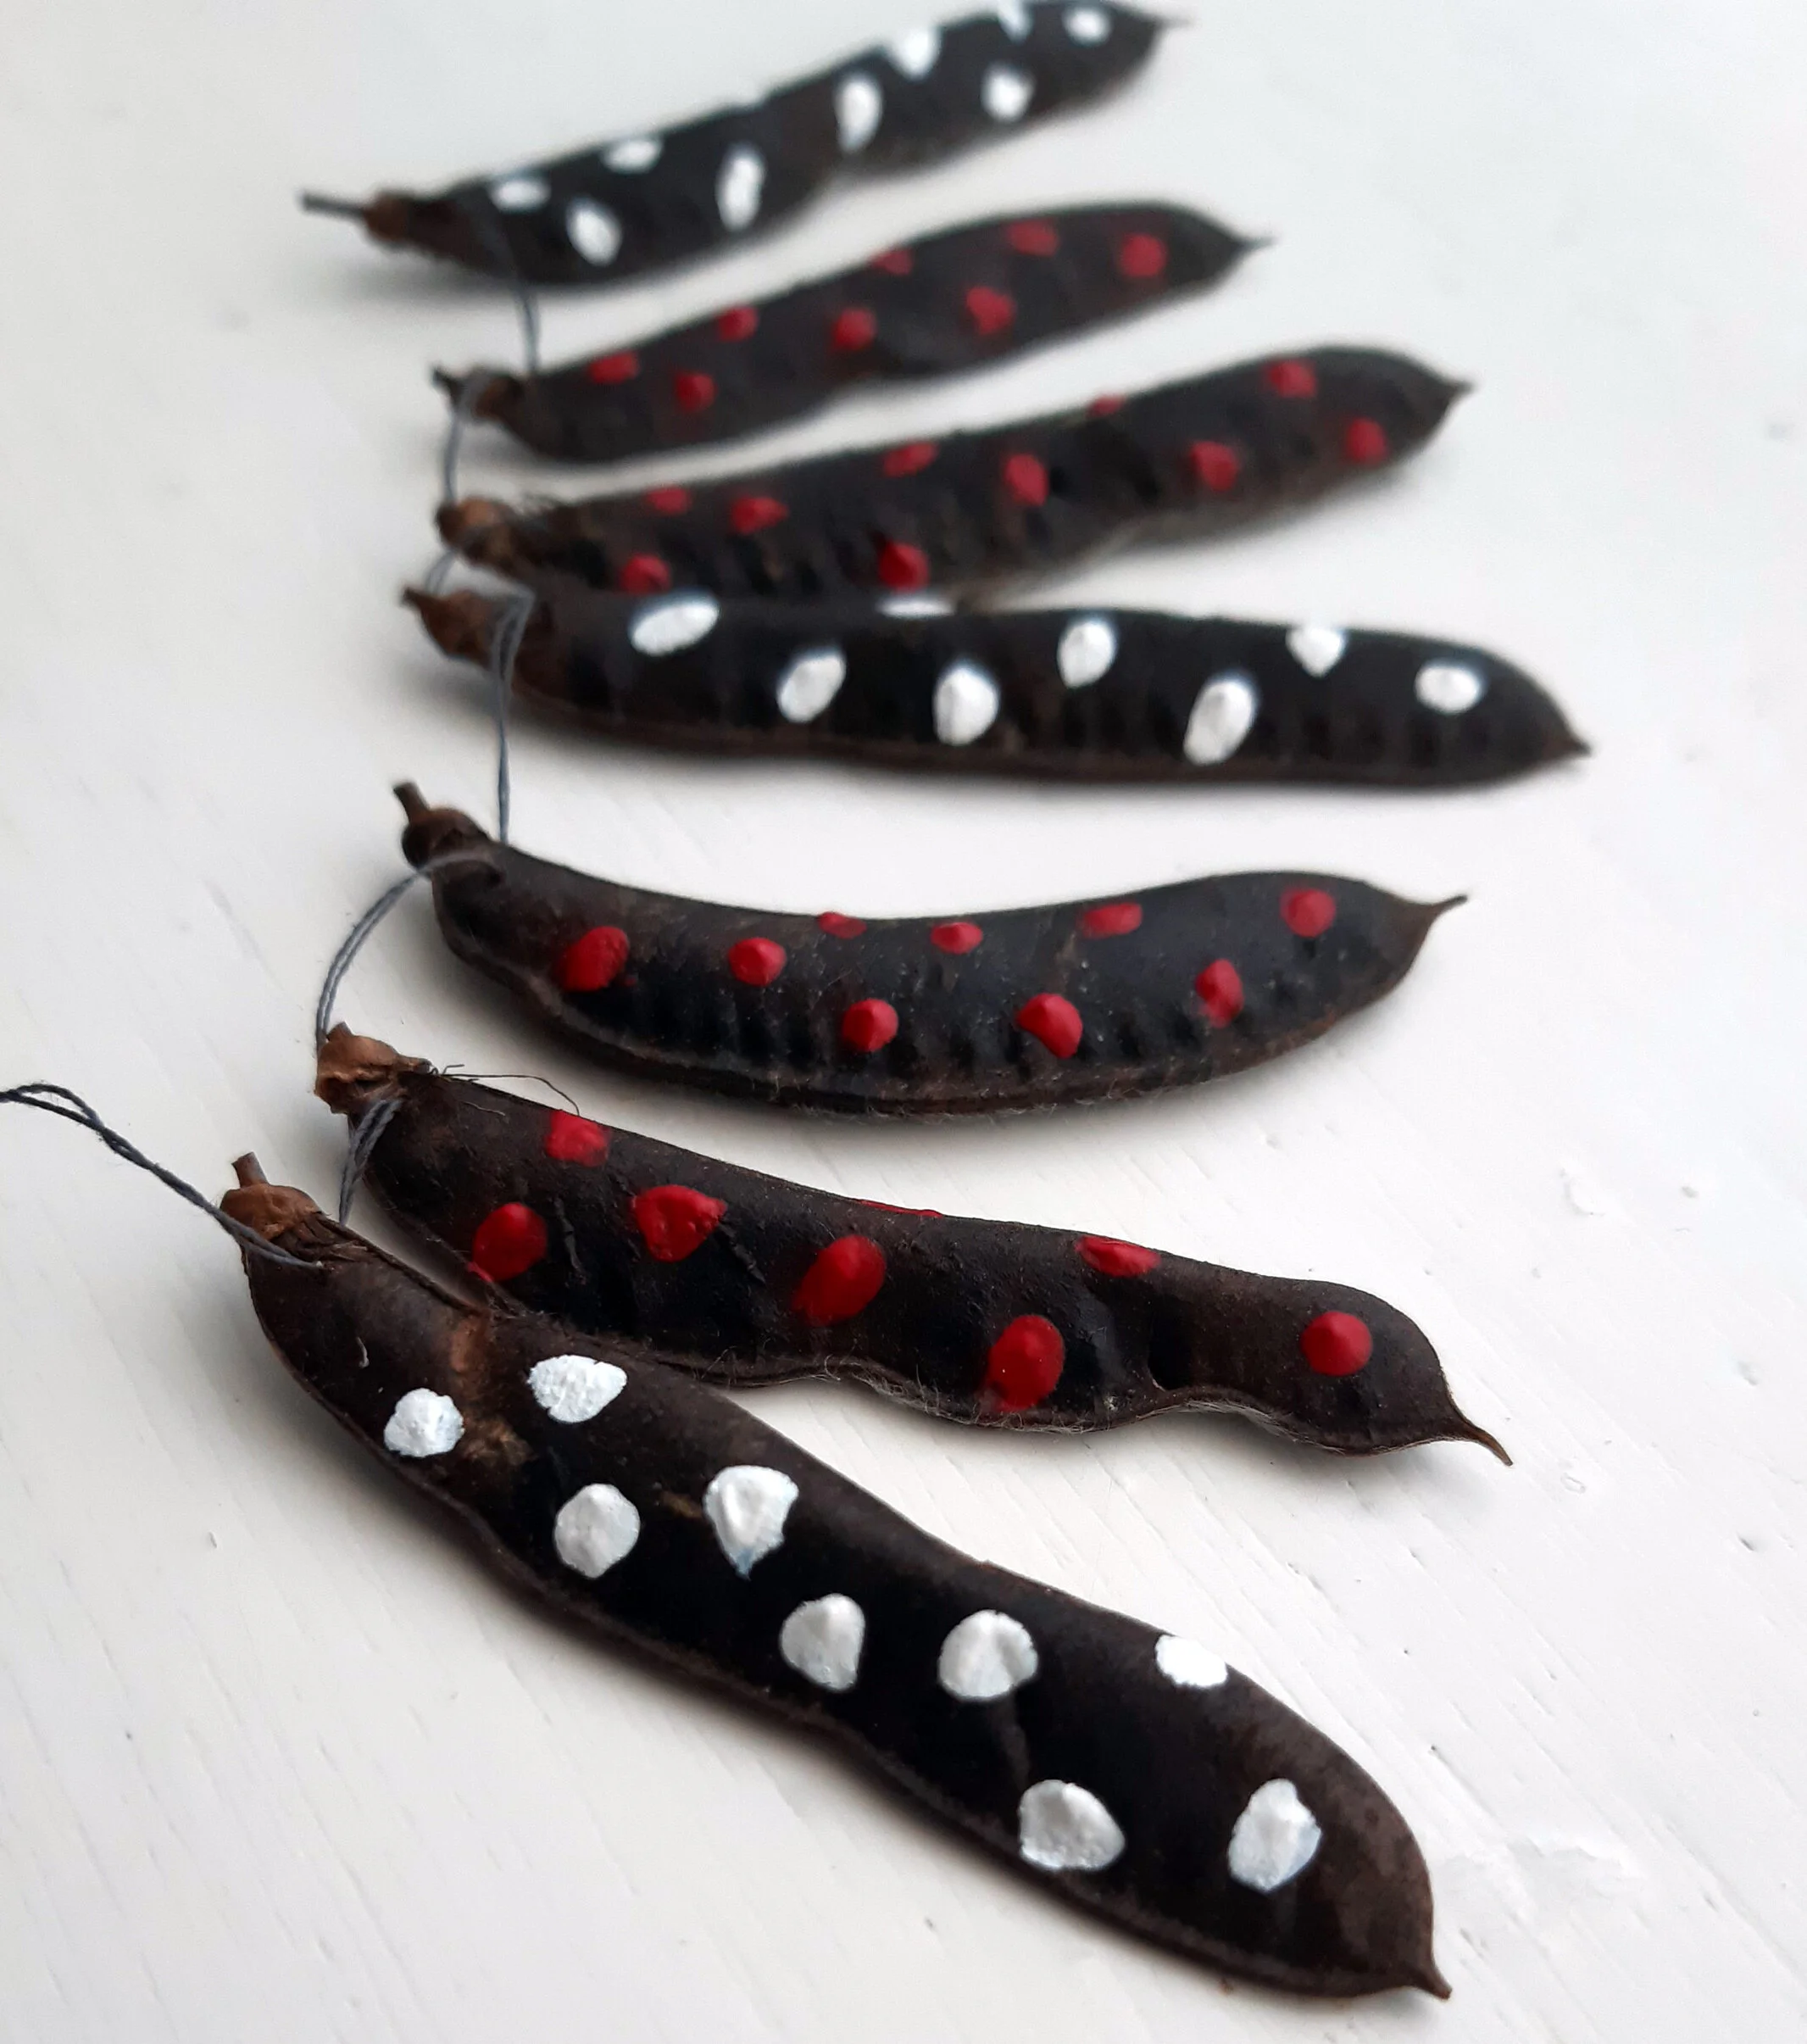
Seed pod necklace. Also make great little shakers if you attach them to something round like an under-worn bracelet, inner ring of a used-up sellotape, a curtain ring. Great time of year for seed pods. These ones are from Common Broom.

Popcorn art. And the best part is, you can eat some while you’re doing it. Buy popping corn, pop it, let it cool then turn it in food colouring, tissue paper dye (tissue paper soaked in water) or paint it. We squashed ours a bit to flatten them out. Really pleasing.

Puzzle pictures. Have you got a puzzle with missing or damaged pieces? Or a favourite puzzle that you or your child are not yet ready to pass on? You could do worse than to turn it into a photo frame. I hope Gruffaloes don’t eat babies.

Fart machine. A household must-have and good clean fun too (no poo particles emitted). A personal highlight was once embarrassing a government minister with a remote-controlled fart machine. This one’s dead simple to make from a bit of coat hanger, 2 rubber bands and a metal washer. Makes a nice 'phut' noise.

Junk art. All you need is a washed milk carton, scissors, glue and colourful stuff to cut up. We used pizza boxes, Who Gives a Crap? loo roll wrapping, magazines, sweet wrappers, a lovely pink NHS letter, and a kids tent that had fallen apart. Add cardboard ears and avoid plastic googly eyes if you can.

Build a bolthole. For the kids! Tree houses are wonderful BIG projects (too tired at the moment…) and fabulous makeshift dens of all shapes and sizes usually need to be cleared away by bedtime if they’ve involved the kitchen table, the sofa, the dining room chairs… So how about a sturdy tepee-style tent? All you need is a blanket or bed sheet, some bamboo canes/sticks tied at the top with string + clothes pegs to hold the 'flaps' open. Fairy lights and cushions will make this the perfect getaway. Think I might build me one too.

Scrap fabric pom poms. Cut strips of fabric (min. 15cm x 1cm, tied end-to-end) from old pants, socks, men's shirts, stained baby vests and bibs, jeans - items you can’t pass on or use for anything else. Pom poms are a fun alternative to bunting, make long-lasting ‘cut flowers’ (pop on top of a stick), or you can play with them like a koosh ball or a hack sack (remember those?) Two main ways of making them - as pictured.

Praise the good guys. See if you and your child can find a toy or item of clothing that has been created with the most care - for your child's development, the environment and the people who made it. Have a look on the company's website for more info. Together, draft an email explaining to them why you think they're so great. They'll be REALLY chuffed to hear how much you like them (and tell your friends about them too, of course).

Sew-a-doll. No need for 'felt' sewing kits which are entirely plastic, heavily packaged, shipped from China and leave no room for the imagination. All you need is a needle with a large eye and some wool + scrap fabric. We used my old jeans, a baby vest that was too stained to pass on (didn't use the stained bit), 100% sheep's wool + alpaca wool for stuffing (you can use scrap fabric too or newspaper for a nice crinkly sound).

Upcycled kite. You just need an old, no-longer-useful plastic bag (the thicker the better) + 2 wooden skewers (or thin sticks). Make a cross out of the skewers and bind in the middle with string, which you can then thread through the middle of the kite to the front. Sew the ends of the sticks to the plastic kite, add a ribbon tail and a bow. Run with the wind! My 6-year-old said, "it looks like you got it from the shops". The highest of compliments.

Sticky rice glue. Happy Chinese New Year! This is the coolest thing, originating in ancient China. The Great Wall of China used sticky rice in its mortar! Just overcook white (Basmati or sushi) rice until it looks like mush. Then drain and squidge it through a sieve (or blend it). Try sticking different materials together - it works on paper, plastic, fabric, feathers, wood... And if you want to un-stick something, you just steam it! Store in a jar in the fridge.

Fun in the snow. Have you tried decorating the snow with food colouring? Just dilute in water and make merry. You could scare the neighbours with some ‘blood’ splats like this one.

A winter scarecrow. Made from frozen clothes! Clearly Elsa can’t handle Scottish temperatures - her dress froze solid overnight on the washing line. We dipped all the clothes in water then hung them out. By morning they were stiff as cardboard. We (gently) nailed them to a plank of wood. Looks like she froze mid-jump.

Animal snowprints. See how many paw and footprints you can find and throw in a couple of your own! See if you’re lucky enough to see rabbit, hare, badger, fox or deer prints. Look here for how to identify them.

Animal cut-outs. So simple, so effective. Just grab some old cardboard (the thicker stuff) and copy what folk are doing on Pinterest.

Can lanterns. These are so much cooler than I expected. You just hammer some holes into your tin can, with or without its paper sleeve, and then hang them up on a branch outside with some string. Brings a bit of magic to the garden in the early evening and anything that entices children outside, even after dark, gets my vote.

Chalk drawing. On a pavement. Your child can swim underwater, walk on the moon, fly with a unicorn…. anything.

Find your own clay. Just like in the olden days. You actually can! Be prepared to dig a few holes and get grubby paws. Guidance on how to find and process natural clay here. We air-dried our creations for 2 or so days before we painted them. If you want to decorate with feathers etc then stick them on while the clay is still wet.

Toy swap. Long school holidays mean swapping toys, games, books or sport equipment/musical instruments with friends is in order. Borrowing from a friend first is a great way for children to try new things (before investing in buying them) and to satisfy their ‘burning’ desire for a particular item they can just borrow it for 1-2 weeks instead. This ‘share house’ [pictured] was set up in Amsterdam on a residential street, if you just want to pass things on without needing them back. Photo credit: Harmen van Sprang.

Alphabet game. Pick a room or a theme and collect objects beginning with each letter of the alphabet. Simples. Great way to get more use out of what you already have in the house.

Mud fun. Think beach, baking, potions and witch’s brews. You could make mud castles (with or without a beach bucket) + moats, various mud concoctions and ‘medicines’ with added ingredients like leaves, twigs and petals, mud men or mud muffins (if your cookie cutters and muffin cases are easily washed), with flowers for ‘icing’. There’s an array of inspiration here and they encourage you to send in pictures of what you get up to.

Birthday hats. It's my little one's 3rd birthday next week. We’ll be using our endless stash of children's paintings and drawings to wrap presents, as always, but have discovered a new use for those that are too small to wrap anything with. Cut a semi circle (24cm in length), fold round and stick. Punch holes each side for ribbon/string and reinforce holes with a tiny square of hole-punched card, stuck out of sight on the inside.

Make a quill. If you’ve eaten too many blackberries, how about writing with them. All you need for your quill is a feather that’s at least 8 inches long. We got lucky with this giant peacock one. Instructions here on how to make your quill. For the ink, mush the blackberries through a sieve, add a pinch of salt, a couple of drops of white vinegar, and you’re away.

Rosehip decorations. So many beautiful rosehips about at the moment. If you thread them with a sewing needle they make great decorations for the Christmas tree or bracelets and necklaces. Collect in the Autumn and dry them out in paper bags/envelopes, in time for the season of Christmas madness.

Decoupage. Wow this is a fabulous waste-avoidance discovery. You can basically transform anything with a smooth surface into something you no longer want to throw away, will enjoy using, won't want to replace. We turned a shoebox into storage for my 6-year-old's My Little Pony toys. But any wood or glass surface works. You just need to mix equal parts of PVA glue and water, then brush it onto the surface, then carefully brush another layer on top of the paper you've stuck down. I used a tea towel to pat it dry afterwards to avoid little glue spots forming. You can use anything made from paper- your favourite magazines, stamps, old postcards, maps, special show tickets, those pretty paper bags you don't want to throw away...

Skit-in-a-bag. I like this because you can tweak it to suit; add more or fewer items depending on the child's age, include one of their favourite toys to get the ball rolling, add something edible (to be eaten afterwards) as an incentive, add a twist and turn it into a 'feel-and-guess' game where you only get to feel the items in the bag before you tell your story. For the spouse, include random stuff that makes it difficult, obviously.

Play shops with a difference. Look up The Toy Project - they pass on preloved and unwanted new toys to children who don’t have any (in the UK and abroad). Talk about who those children might be. Take it in turns to play the donor, the shop assistant, a child beneficiary. At the end, see if your child wants to donate any of their toys to a local charity.

Dog hair felting. There might not be many takers for this one. We got talking to a poodle’s owner in the park, which sparked an idea to use its hair to make felt. It worked! Wet felting is super child-friendly (no needles involved) and then you can dye it (we used tissue paper in boiling water) to make greetings cards, decorations, bags or toys. It's fully compostable, unlike the shop-bought synthetic stuff,. We got hold of lots of poodle hair from a local dog grooming parlour (don’t worry – it’s washed before it’s cut) and it would have just been chucked out otherwise. If you make a felt toy, you can stuff it with the unfelted dog hair too. Instructions for how to wet felt starts here around 32 minutes.

‘Anthotype’ leaf printing. A fun way of making prints, using sun exposure and natural dyes. Soak some plain paper in red cabbage juice (beetroot or red wine works well too) then let it dry out. Place a leaf - this is from cow parsley - on top and press it under glass. Leave it in the sun for at least one week. This is a mid-19th century printing technique; it’s how they made old photographs! More info here.

Finger painting. Fold a few pieces of paper together into a little booklet. At the top of each page do a finger-painted picture - dinosaur, bee, ice-cream, ladybird… - for your child to copy. Use an old sponge or a cotton wool ball and soak it in some paint, food colouring, natural food dyes (beetroot, turmeric etc) or mud, for your child to press their finger into.

Homemade play dough. Standard but useful stuff. Mix 1 cup flour (I used a long out-of-date gluten-free one that I had bought in error), 1/4 cup of salt (an under-used item in my kitchen), 1 tbsp veg oil + 1 tbsp lemon juice. Add food colouring to 1/2 cup of just-boiled water, slowly stir into dry mixture. Knead madly for a few mins. Go crazy then store in airtight container.
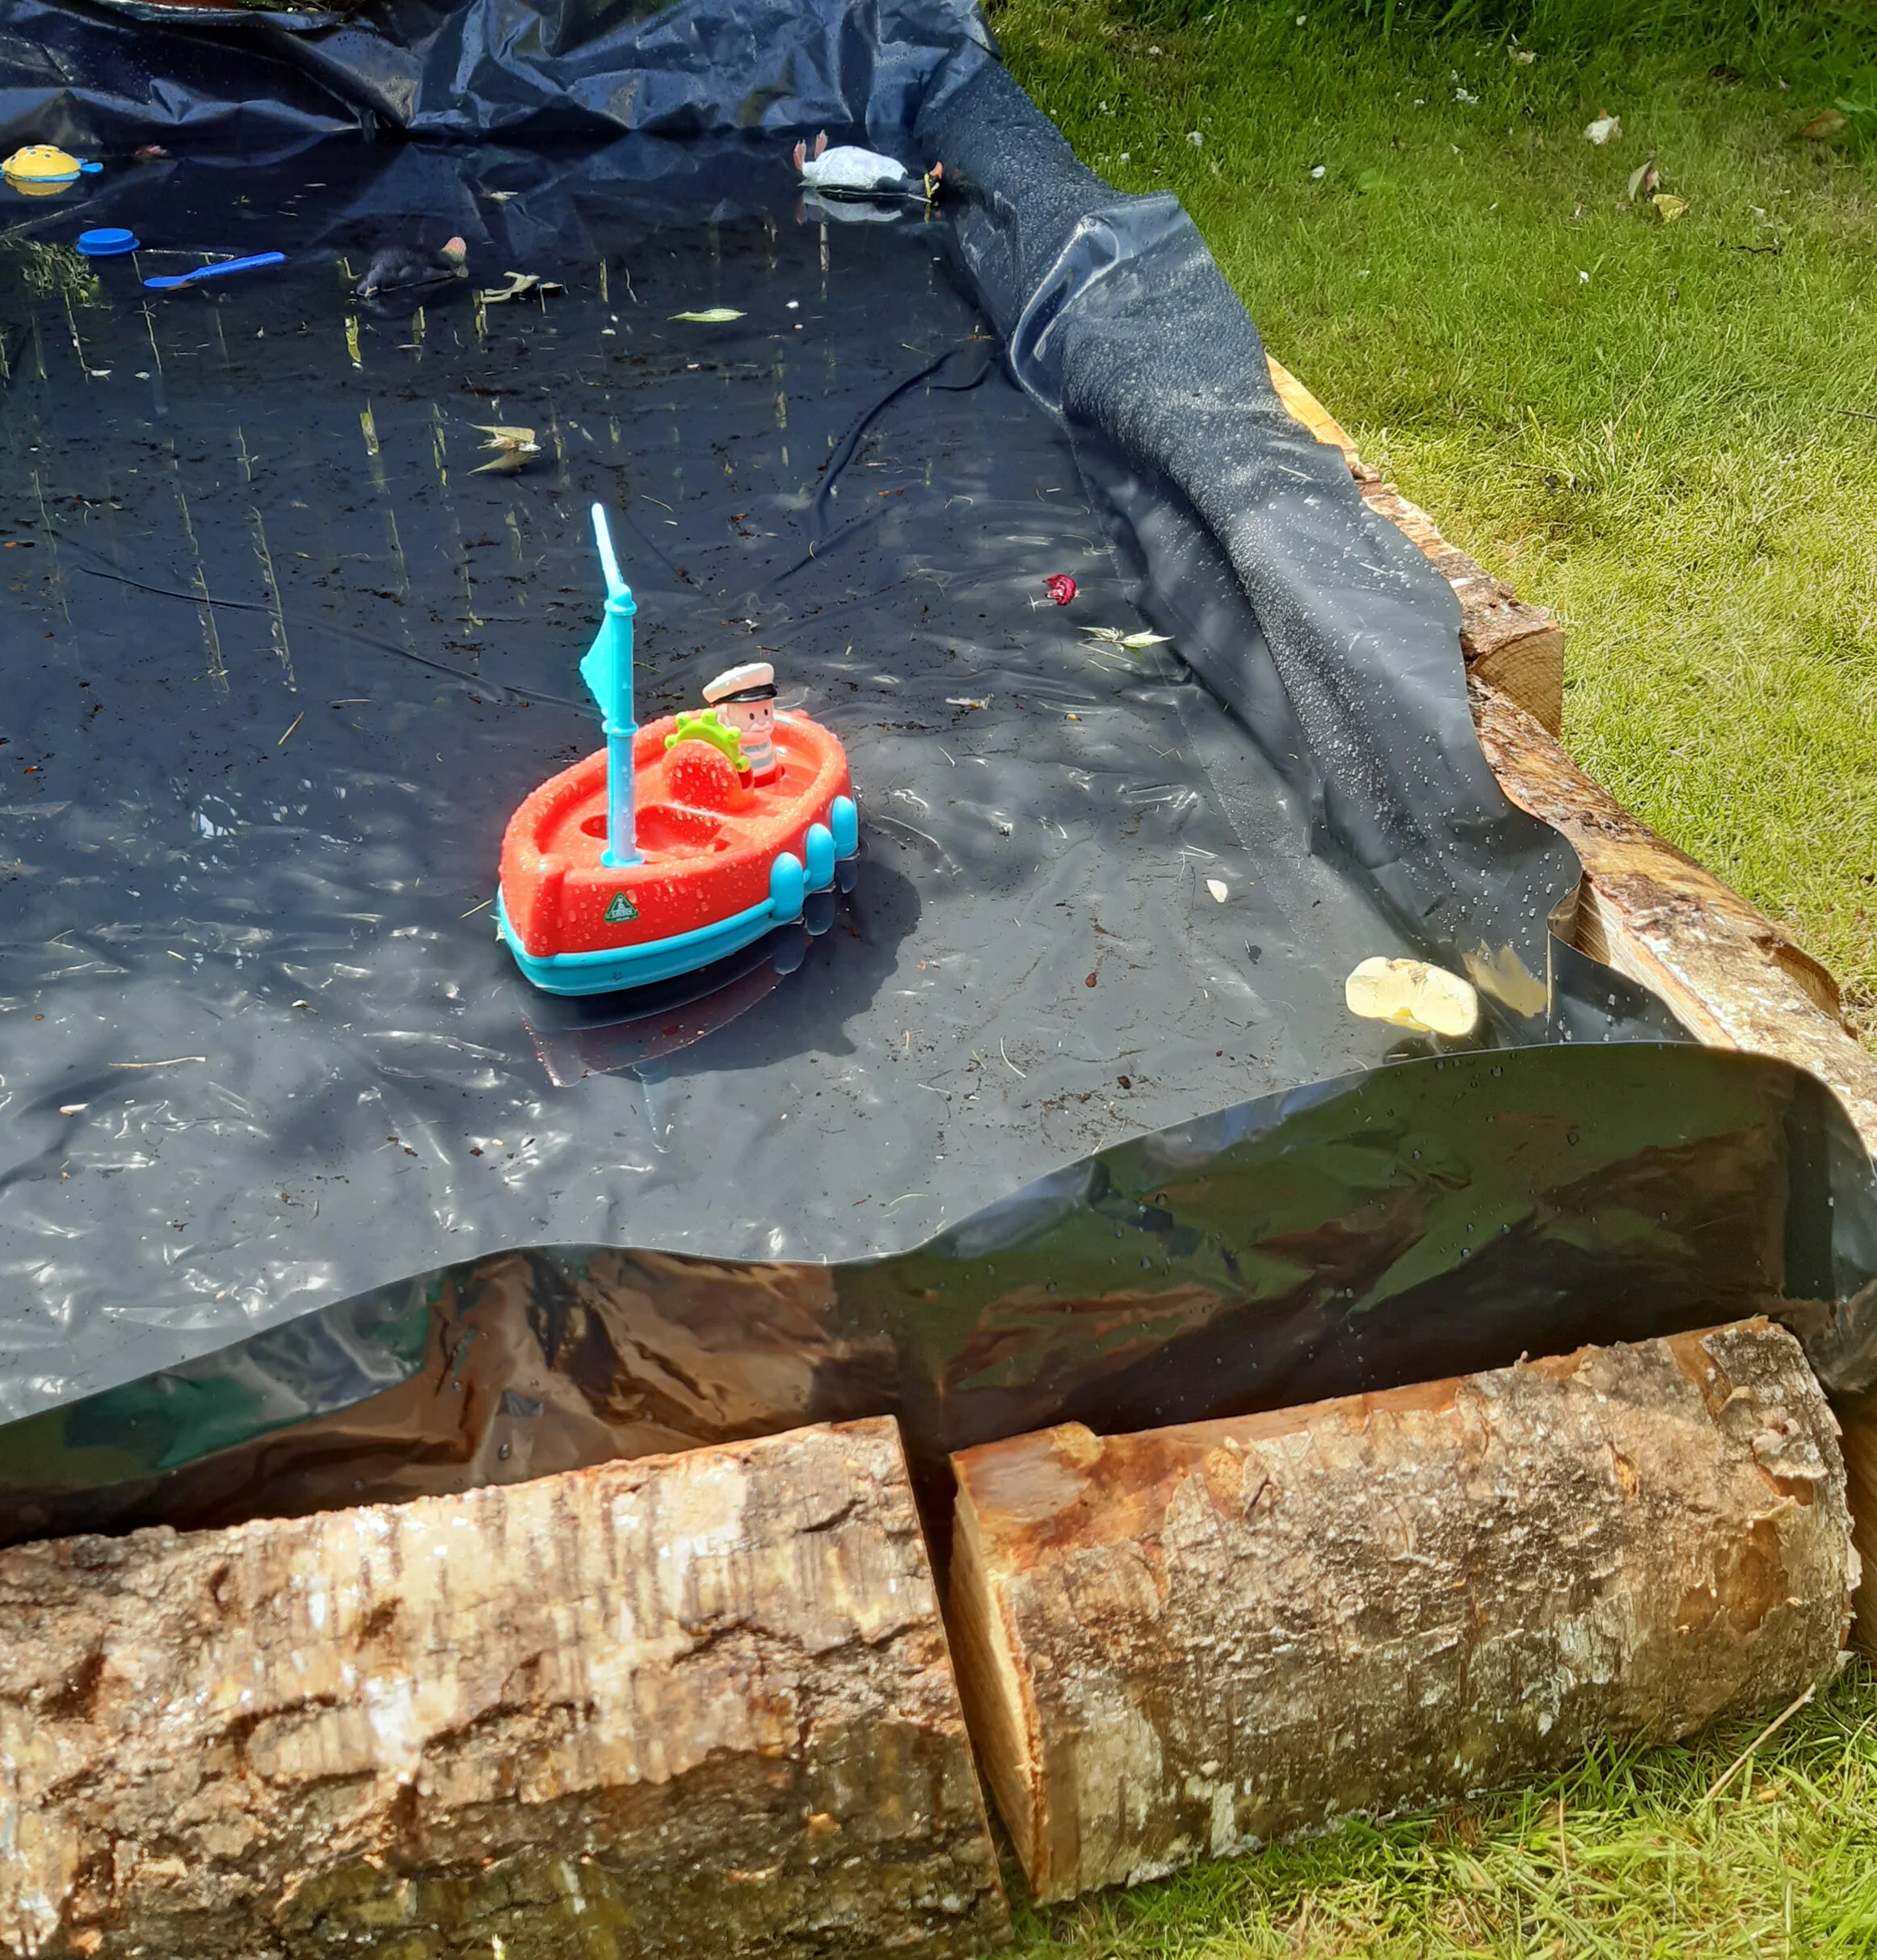
DIY paddling pool. It's just too boring when paddling pools get an unlocateable hole and you just have to chuck the whole thing out. Why not get 2m x 3m (750g minimum) black heavy duty plastic sheeting. Pop some logs or similar in a square, pop the plastic on top and the water weighs it all down. Wrap the sheeting over the edges and tuck under, if you’re worried about splinters. The black colour of the plastic adds a bit of warmth to the water too!

Jewellery. Wrap sweet wrappers, past-its-best old wrapping paper, scrap fabric (we used my 6-year-old’s wrecked leggings - glue fabric to paper first) and anything colourful and shiny, around a pencil. Secure with some tape, et voila. Pasta works well too - plain and painted (check out La Molisana pasta). If using string then tape the end with some sellotape (so it looks like a shoelace end) to help with threading the ‘beads’ together.

Tissue paper dye. These Hare's Tail Cotton Grasses came up smashingly when dipped in tissue paper dye. Just add boiling water to some scrunched up tissue paper and then submerge things for 30 mins. It works well with thistle ‘seed heads’ (in the autumn), feathers, cotton balls, rice, sheep’s wool, pasta, rose petals and fabric too (be warned: it stains!).

Make some bioplastic. Making your own biodegradable plastic is quite fun because it reminds you of the resources (raw materials + energy) that go into making items, even if they then break down in the soil after they have been disposed of (unlike fossil fuel-based plastics). This is important because biodegradable or compostable plastics are still a waste of resources if they are used for disposable items like bags, packaging, cutlery. Try making plastic out of milk + vinegar, cornstarch + vinegar, cornstarch + oil, and by adding other materials to strengthen it.

Masks. Pigeon feathers are ubiquitous and it turns out they are quite useful as mask feathers. This flamingo looks a bit menacing and the pigeon’s grey feathers mean the pink comes up quite dark, even after two coats. But my 6-year-old was happy. Children’s imaginations are generally better than adults’ so don’t despair if you can’t see the animal or bird in your mask, that is meant to be there. I bet your child can.

Play foam dragon prints. Or anything else you fancy doing with foam! Hadn’t tried this before - all you need is canned chickpea water (I used two cans' worth) + an electric whisk. Takes upwards of 20 minutes - don't give up. You'll get there. You can add food colouring before you start whisking. Great for foam fights.

Edible face masks: Mash 1/2 avocado, 1 tbsp honey + a handful of porridge = child-friendly face mask (that me and the 2 year old then mostly ate). Lots of recipes here

Pan flute! Great time of year for hollow stalks - these are from a herb called Lovage. Then just use the ‘lashing' technique to hold the stalks together (check for slugs and other sweet beasties inside the stalks before you use them).

Basic basket weaving. Oh so cool. And it actually works! I chose honeymoon roadtrip maps that have been too hard to part with but which spend most of their days in a drawer. Your child could easily use their drawings/paintings if they are on large pieces of paper. I followed this tutorial (I used 12 strips that were 2" x 24"). All you need is paper, scissors and string.

Cone fruit and veg. They all love playing kitchens, don’t they? And pinecones come with a range of dimensions that perfectly suit different fruit/veg shapes. Just use some scrap fabric/felt for the stalks and leaves. The really small ones make great blueberries, sprouts, raspberries and grapes, the longer ones carrots, aubergines and courgettes and the more rotund ones cauliflowers, cabbages and broccoli. Not yet found a bendy one for a banana. But I’m on a mission.

Upcycled coat pegs. We’ve had these shop-bought paper mache penguins for yonks and they were just getting under all of our feet (ouch). They weren’t going to be passed on to anyone so we’ve turned them into handy clothes pegs for the children’s jackets. Old, sturdy toys you can’t pass on could also make good bin handles or drawer knobs too.

Teddy blanket. This felt a bit wrong to start with - taking the insides out of innocent soft beasts. These have been diverted from landfill - charity shops struggle to resell stuffed animals - so they’re rescue teds. But after washing their pelts, there's no 'yuk' factor for children and once they’ve all been stitched together this makes a very cosy blanket. Or a slightly macabre wall hanging.

Cardboard houses. So basic, so fun. For your child to clamber into or for their toys. You can put loo rolls as chimneys, a letter box in the front door (my 3-year-old loves posting things), flower boxes below windows... Get inspired here. Boats, rocket ships, cars, puppet theatres and even play kitchens are easy to make too. You’ll just need a bit of space to stash all your cardboard boxes (we’ve spent 12+ months growing our collection, much to the husband’s chagrin).

Rock stacking. Oh this was fun. Stacking cubes keeps the very young busy, but stacking rocks is a real challenge for all ages! You could turn it into a game by giving a child (or grown-up) 5 or 10 rocks that they have to successfully stack without it toppling over. Much more fun than it looks.

Toy car or bus. You just need a cardboard box, some thick cardboard for the wheels + a wooden skewer stick for the axles. Cut the skewer to size and push it through the sides of the bus (front and back), with enough room for it to turn as an axle does. Glue the wheels to the skewers. Keep the back open so that toys can hitch a ride. Not as robust as a shop-bought wooden bus but talk to your child about the importance of taking care of toys to make them last. Show them these inspiring toy creations from child refugees in Uganda.

Homemade games. Games where making them is as much the activity as playing them. Noughts and crosses from sticks + stones; snakes and ladders with books, ribbons as snakes + sticks as ladders; skittles with decorated plastic bottles + a tennis ball.

Collage. A bit of a highlight this one. My five-year-old and I both thought this was a hoot. So much scope. These are some of my daughter’s favourite people and the photo is one of several copies from her Christening, found languishing in a drawer. Will definitely do this again.

Vet’s Kit: Red food colouring ‘blood’, tweezers, torch, tongs (also excellent for tickling), old white shirt for ‘Vet’s Coat’, bits of fabric for bandages + essential pet treats (nuts/raisins). Animal ears optional.

Loo roll fun. Other than a cost saving, the advantage of buying loo roll in bulk is that it provides endless entertainment. Get buried under them, build a wall, a tower, a tunnel, a chair (use a book for the seat), add cone 'turrets' and make a palace. Then balance one on your head and race.

Spaghetti 'sticks'. You know the game where you take it in turns to pick up a 'stick', which you get to keep if you manage not to move any other sticks in the process? Loved this when I was young. The winner is the one with the most bits of spaghetti.

Hair salon time. No need to buy anything. Try a bit of tissue paper hair dyeing, fabric 'rag' hair curling, paint some bog standard (but durable) Kirby grips, braid hair and weave in some colourful wool (add jewellery beads for extra bling), and the waistband of worn out leggings makes a great headband.

Scented teddies. So we have a LOT of stuffed animals in our house. Wonderful gifts from wonderful people. The majority are still enjoyed by the 3 and 6-year-old but a couple of the smaller ones in particular [pictured] get overlooked. Teddies are hard to pass on (everyone has enough) and charity shops don’t always take them. So what to do? Revamp into a sleep aid (lavender is especially soothing), a bookend/doorstop (fill with sand) or simply flatten them all out and stitch together into a blanket (major space saver).

Collage creatures. The fun is not only in the making - cutting up old birthday cards, magazines, leaflets - but also in bringing these creatures to life. What do they eat? Where do they live? What are they called? What are they like? The ‘bottle’ monster with the ‘tie’ apparently eats through the top of its head. Really fun (let your imagination run wild) and really satisfying (especially using up those glittery cards, which can’t be recycled).

Rain stick. Just because they sound wonderful. Get a toilet or kitchen roll tube, push some short nails into it at 2cm intervals, pop some beans or lentils inside, then secure the ends with fabric and elastic bands.

Abstract art. There's definitely more to art than messy paints. I've said that before. For inspiration, have a look at some of the more well known abstract artists and find some waste materials from around the house to use. Another way to make use of what you've already got at home. Open up a conversation about 'junk art' being fun and creative, and a great awareness raising tool, but that it isn’t a solution to our mounting waste problem - my 6-year-old sometimes says “it’s not waste, we can make something with it”...

Fairy dust. Coat a handful of rice in food colouring and then lay out to dry on a piece of paper. Once dry, grind in a pepper or salt grinder. You can also sprinkle the ‘dust’ onto glue to make pictures and use the piece of paper the damp rice dried on as a picture too.

Natural paints. Running low on paints? I am. Food is, of course, best for eating but a little goes a long way. Mix a little water with turmeric (or boil an onion) for orange, spirulina (or boil a little spinach + grass) for green, and cacao or instant coffee for brown. Mash up some beetroot or blackberries for pinky purple. Then it can all safely crescendo into a body painting session.

Imitating art. We chose Banksy for inspiration, and attempted to copy a recent piece of his work 'bathroom lockdown art'. We used wall stickers dangling on thread, yellow paint as wee and yoghurt blown through a straw for toothpaste. Had a blast doing this.

Modelling clay. Lots of ways to do this but I used 1/2 cup flour (out-of-date gluten-free flour I wasn’t going to eat), 3/4 cups of salt (I used out-of-date chilli salt that I can’t use in cooking as my children won’t eat it) then added water until it was sticky but not wet. Bake at medium temp for 15 minutes. To make a necklace, stick cocktail sticks into ‘clay’ balls before you bake them. Something for Granny’s Christmas?

Upcycled cardboard box. Another ‘storage solution’, as they say, without having to buy anything new. Great for storing pretty much anything - foraged crafts, paints, soaps... Just roll a few magazine pages and stick them to the sides of a cardboard box. Fits nicely and neatly in cupboards and on shelves.

Cat collage. Nice and simple and no need for messy paints. You just need an old magazine or newspaper and some black and orange card (or see if you can find these colours in old magazines or among your cardboard recycling). Love how effective just a few bits of paper can be. Collage - so underrated! This and other collage ideas from Art Projects for Kids.